Have all of the necessary resources to do what you suggest with the exception currently of the test tag so happy to progress as proposed.
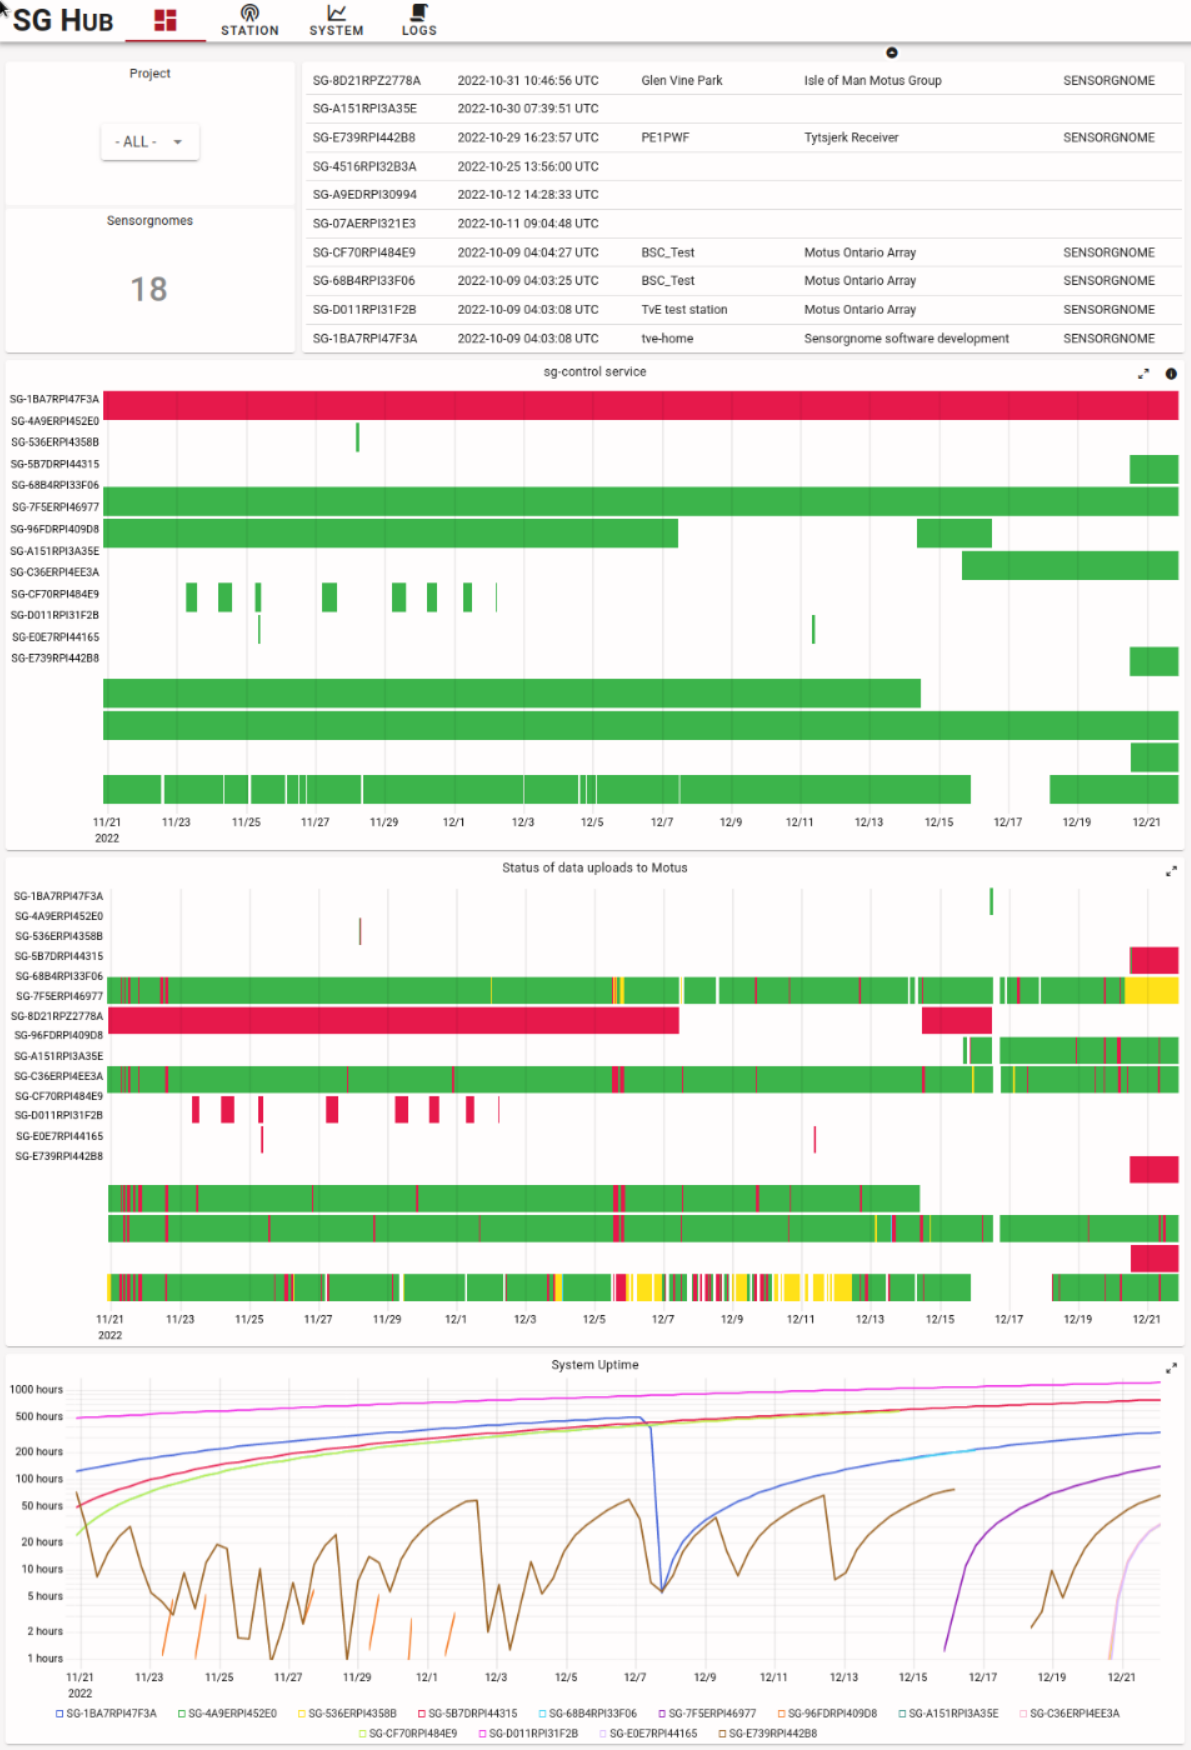
The Sensorgnome Hub web site is live! It’s definitely still a work-in-progress but having a centralized monitoring site has already allowed me to spot and troubleshoot a number of issues. At the moment the site is still password-protected but anyone interested can send me an email to get the password. If you have comments or feedback I would appreciate! Note that some of the charts have a little (i) button you can click for a little bit of info about the data.
As a teaser, this is the overview page (reduced screen shots):
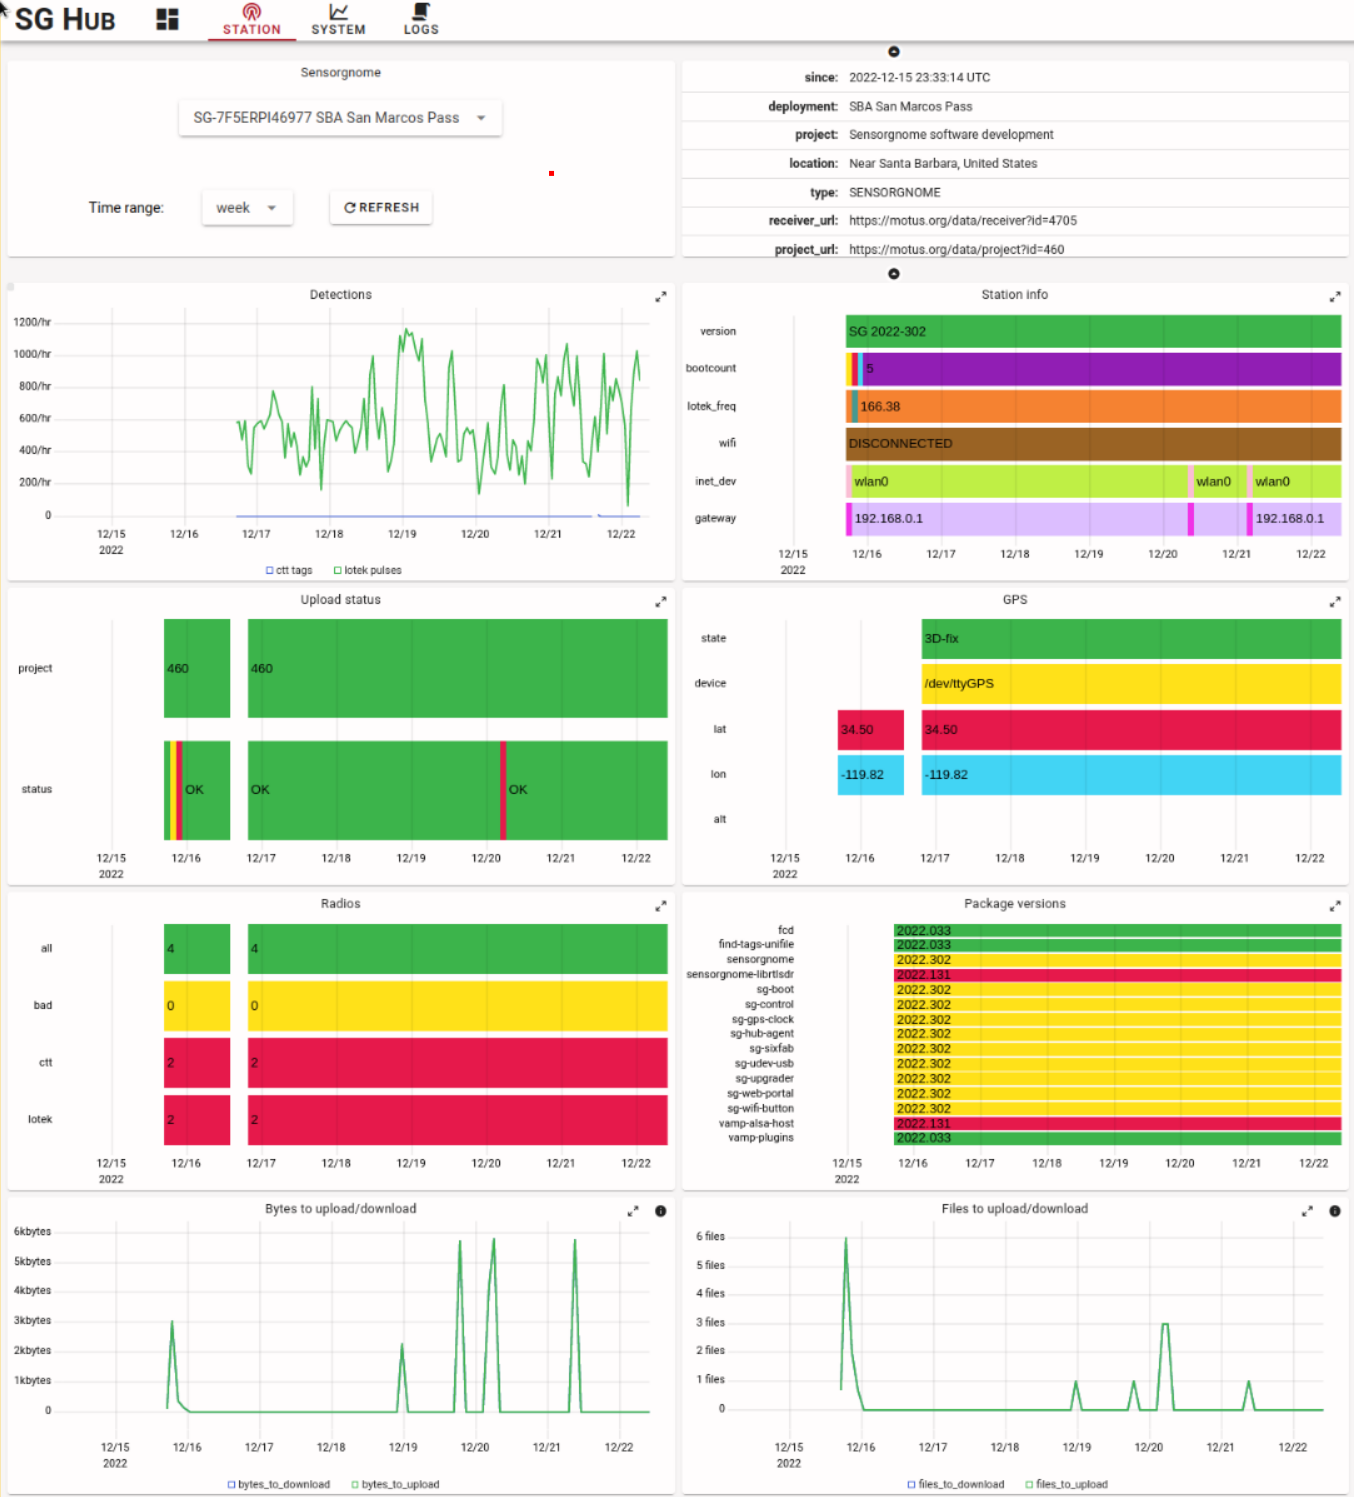
And a station page:
I now have a To-Fix list including an SG that stopped uploading, one where the system monitoring agent has trouble, and mine that really doesn’t like the USB hub I connected…
Happy holidays!
Thorsten
New release candidate! v2.0-rc8 @ https://sensorgnome.s3.amazonaws.com/images/sg-armv7-rpi-2.0-rc8.zip
This release fixes most of the outstanding issues and cuts down on the network bandwidth to hopefully enable the use of IoT-type cellular plans.
The testing by various people here has been invaluable: there’s no substitute for having multiple people try things their way in their network/computing environment. I hope some of you can give this new version a spin and report any findings!
The roadmap to v2.0 release looks fairly short barring any surprises. I have a number of “highly desirable” fixes and improvements and I expect that we’ll see some failures in the field that will need fixing or workarounds. I also assume the bandwidth management for cellular will need enhancement.
Upgrade: if you have a SG with a prior release candidate you can upgrade using the web UI. The short form is to click on “check” and then on “upgrade”. Do NOT use the grey “sysupgrade”!
The upgrade UI is clunky and lacks feedback (that’s on the list for RC9…):
- After hitting “check” wait some 30s to see the list of upgradable packages (long).
- After hitting “upgrade” wait several minutes until you see “Setting up sensorgnome (2023.0xx) …”
- Take a look at the web interface (it should ask you to re-login) and finally reboot.
Fresh install: the short form is to download the zip image at the link above, flash it onto an SD card, power up a rPi3/rPi4/rPiZero-2, use the hot-spot to configure. The details are described at https://docs.motus.org/sensorgnome-v2/
NB: I’d like to discourage off-network installs still, unless you want to specifically test that. The feedback to detect, troubleshoot, and fix issues on SGs that are connected to the network is so much shorter. That being said, if you’d like to specifically test disconnected operation that would be great, just ensure no science gets harmed if the station fails 5 minutes after you leave it.
The list of fixes and improvements in this version is:
- automatic renewal of the HTTPS key/cert
- fix hotspot password (always set to same as SG pw)
- run everything in UTC (currently EST which becomes crazy when the SG is in CET and the troubleshooter is in PST and server logs are in UTC)
- reduce bandwidth used by shipping uncompressed logs
- ensure all http requests to SG hub are compressed
- print clear start message in sg-control log to help troubleshooting
- improve sg-control logging of updates/upgrades (the logging to upgrade.log seems to break)
- add safeguards to upload dying (see ISSUES.md “SG-5B7DRPI44315 stops uploading”)
- fix telegraf not starting after system upgrade
- fix sg-control not starting due to chrony start-up delay
- remove session token in “refreshing motus session” (security issue)
- enable fsck for /data
- implement systemd watchdog for sg-hub-agent to avoid hung agent
- reduce telegraf monitoring interval to 10 minutes (was 1m)
- direction finder detections widget needs timestamps
- add system shutdown button
The list of fixes/improvements for the next RC is kept at Fixes and improvements for v2.0-rc9 · Issue #16 · tve/sensorgnome-build · GitHub
The “highly desirable” set so far is:
- CTT detections on home page are bogus (seem to duplicate lotek detections?)
- improve update/upgrade process UI (needs better feedback)
- turn hotspot off automatically, offer “off”, “on”, “20m@boot”?
- make gpsd polling quicker at start-up, try to fix “no-dev” shown
- add monitoring of tags detected to SG Hub
- support remote commands via SG hub, start with remote reboot, restart sg-control, hotspot on/off; include option to disable all remote commands
Happy Motusing!
Thorsten
Quick add-on: in order to perform a software upgrade, on the software tab, one has to flip the “enable changes” toggle so the check and upgrade buttons become active. I’ve had two people remark that it’s not obvious enough, so I’ll be fixing this for the next version :-).
Hi, last week i grabbed a spare RBPi 3+ and a FunCube and built a SensorGnome in a couple hours for a friend who is managing her own little station. Well done Thorsten! One of the cleanest installs of RBPi software i’ve ever done. Her previous homemade RBPi station would not connect to the Motus server.
A couple questions when you get a spare moment:
-
do we still need the switch on pins 17 and 18?
-
her install shows downloading to the Motus server (clicking on her “dot on the Motus map’” shows “Last data received” today around 01:20 zulu) but I can’t find her Sensorgnome in the list on your Sensorgnome Site. The device ID is SG-7F40RPI3DC6B
-
is it safe to click the update software button? Lol, the install went so well I wouldn’t want to wreck anything. :)
Again, great work!
Thanks
Mark
Mark, thanks for the positive feedback!
The button on pin 18 and the LED on pin 17 are there to start/stop the wifi hot-spot. Currently it’s always enabled by default, so in a way you don’t have to have the button there. Especially if you can access the SG over the network you don’t need it.
WRT Sensorgnome site, are you accessing https://www.sensorgnome.net ? You need a username/password, which I’ll send you via separate email.
WRT update, yes, it is safe to click the upgrade button (not the sysupgrade one) however, I wouldn’t recommend it at this point 'cause there is little benefit to you. The two fixes you get with rc9 are:
- reduce internet bandwidth by reducing connectivity check frequency (wasn’t backing off)
- fix display of 5-minute CTT detections
If you do decide to upgrade, you first need to enable the button on that page, then hit check and wait for the available upgrades to populate, then hit upgrade and wait several minutes for the process to finish looking at the log panel. Finally I recommend a reboot. The upgrade process is not nearly as polished as I would like, sorry for that. (It’s also very tedious to test and improve…)
Let me know if you have trouble or questions!
Thorsten
Hi Thorsten, you are welcome, you’ve done a really good job.
Okay, first, button is to turn ON/OFF the hotspot, thanks.
Second, lol it certainly helps if I look at the correct website. Thanks for the password. That’s a pretty cool website, lots of useful information! Indeed her SensorGnome was there, thanks!
Third, next time I’m out at the install I’ll give the upgrade a try. Appreciate the extra instructions.
Sorry but a couple extra questions when you get a moment
-
CTT tags - I emailed CTT about purchasing their dongles. They let me know today that they do not sell CTT dongles anymore but I could purchase one of their SensorStations (unfortunately a bit outside a retired guys budget). Does your new software still need CTT dongles or can we use FunCubes?
-
any recommendations for a 4 port USB hub?
That’s it for now. :)
Mark
Mark, don’t hesitate asking questions!
WRT CTT radios, let me find out. You’re going to need some $25 Adafruit boards (Adafruit Feather 32u4 with RFM69HCW Packet Radio - 433MHz [RadioFruit] : ID 3077 : Adafruit Industries, Unique & fun DIY electronics and kits), SMA connector pigtails, prob u.Fl connectors, some soldering skills, and the firmware. Let me find out about the firmware, ideally CTT makes theirs available, but there are other options. (One version of the CTT dongles uses this exact board.)
WRT 4-port USB hub… I have one I strongly DISadvise buying, it’s a Sabrent hub (Amazon.com) and it’s giving me trouble, i.e. low-level errors. I have a couple others that I just got but haven’t plugged in to see whether they fare better. Note that everything is USB1.1 and USB2, so a USB3 hub doesn’t do anything better (in fact, the way USB works, the USB3 hubs also contain USB2 hubs “in parallel” and the devices end up using those).
Thorsten
Hi Thorsten
Thanks again for all the advice!
The Adafruit 433MHz boards and pigtails are on their way, should be here by Apr 5th.
I’ve got a pair of Vantec USB hubs (https://www.memoryexpress.com/Products/MX31014), will see how they fare on the next station build (three 166 yagis; three 434 yagis) hopefully in the next three weeks. . The current build only has the one antenna, so not quite hub worthy. :)
Mark
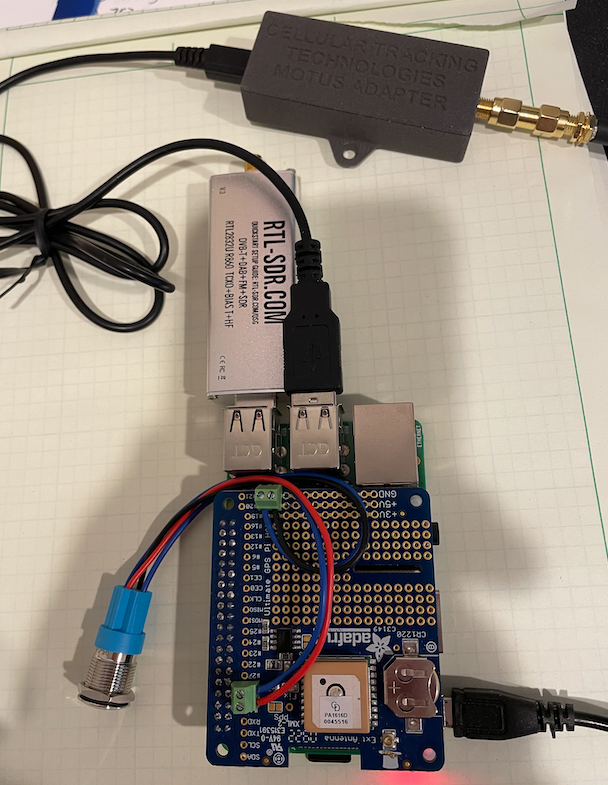
Im a Sensorgnome newbie. I just di my first flash and install sg-armv7-rpi-2.0-rc8 on an RPi3 Model 3 v1.2 Things were going great, the web interface recognizes a rtl-sdr radio on port 4, and the GPS hat etc but nothing I try gets it to recognize the “CTT Motus Adapter” someone has loaned me to try. (see photo)… Ive tried all 4 ports, rebooting, refreshing browser in between changes etc. I have a new microUsb-to-USBA cable coming by mail in case its just a bad cable. Any other suggestions of what to try? Do I have it connected correctly? Should that adapter ‘just work’. I have no idea how old it is etc.
-Rich
The new usb micro->USBA cable cable did the trick! The adapter now shows up on the web interface.
-R
Rich, that looks nice! I’m not seeing your SG on www.sensorgnome.net, if you can connect it to the internet, e.g. via your home/lab wifi it would upload log files which allow me to troubleshoot the issue.
To answer your question: yes, it should recognize the adapter automatically as soon as you plug it in. You can also plug the CTT dongle directly into your laptop. I believe you have the type with the Adafruit board, so it should show up either as a USB-serial device or Adafruit something. If you have a test tag, open the serial port using a terminal app (the baud rate doesn’t matter 'cause USB IIRC) and you should see short lines show up with the tag ID (8 hex digits) and the RSSI.
If the dongle doesn’t show up when you plug it into your laptop try a different cable.
Hope this helps!
Thorsten
Thanks Thorsten. It recognizes the CTT Adapter and looks like it is showing up on sensorgnome.net now. I cant wait for my test tags to arrive!.
Looks good! BTW, you can change the short-name anytime on the first tab. There’s a little table: click the pencil icon, change the shortname, click the checkmark icon. The title bar doesn’t update until you refresh the page but the name change takes effect immediately and is reflected on sensorgnome.net within the hour (normally).
Hi Thorsten,
This is great, the installer went on my RPi4 with USB hub hat and GPS hat without a problem, detected the RT820T2 USB stick and allowed for changing frequency to each of the MOTUS frequencies. Sadly no tag available for testing.
Anyway, the primary reason for installing sensorgnome is for CTT 434MHz detections and I was a bit surprised to see RT820T2 sticks do not appear to be able to change to 434MHz. Is this a hardware limitation of the SDR? It seems like the adafruit board https://www.adafruit.com/product/3077 is the solution. It’s cheaper than a RT802T2 stick so that’s a bonus so I’ll get some ordered.
The next, probably silly, question is I keep seeing Red Knot with antenna sticking out their tail, these are using ATLAS/WATLAS tags on 434MHz. Would it be possible to use the same adafruit board to read the transmissions from ATLAS tags? If I can make something like that work would there be any further interest in making whatever code I create available to the MOTUS community?
Anyway, great job with the SensorGnome package - it’s making building a receiver so much more accessible.
Regards,
Richard
Hi Thorsten,
The Adafruit boards arrived today (https://www.adafruit.com/product/3077). Dare I ask if you’ve had any luck determining a way to use them to receive and log CTT signals? :)
Anything I could do to help? Do you need one as a test board. You’re only three days away by CanadaPost.
Hmmmm, CTT reception is almost it’s own thread.
Mark
Hi All,
I think I’ve had some success here although I don’t have a handy CTT tag to test it and I’m still awaiting a 434mhz antenna. Plugging in the adafruit board with a fully wired USB lead allows the sensorgnome install to pick it up as a CTT/CornellRcvr so that’s a good start. The adafruit board then needs programming with the CTT code. This is available from:
https://cellular-tracking-technologies.github.io/ctt_documentation/updatingV1radios.html
Section 1.6 Part 4: Running the Radio Update Software contains a link to a zip file which contains the hex file for the adafruit board. There is an updater script in the zip file for a sensorstation however it’s only a useful guide to get the right commands. What I’ve done is:
Copy the zip file from CTT to the sensorgnome and then ssh’ed into it.
Install the arduino programmer: sudo apt-get install avrdude
Find the device: ls /dev/serial/by-path
Unzip the CTT files: unzip SensorStationFiles+2.zip
Change directory to the location of the hex file: cd SensorStationFiles\ 2/
Push the reset button a couple of times on the adafruit board a couple of times to get it into programming mode and quickly move onto the next step
Programme the adafruit board using avrdude and serial port found above with the command: avrdude -P /dev/serial/by-path/platform-fd500000.pcie-pci-0000:01:00.0-usb-0:1.2.1:1.0 -c avr109 -patmega32u4 -b 57600 -D -v -Uflash:w:ssr_v2_3_1.ino.hex:i
If all goes well you should see the following output:
~/SensorStationFiles 2 $ avrdude -P /dev/serial/by-path/platform-fd500000.pcie-pci-0000:01:00.0-usb-0:1.2.1:1.0 -c avr109 -patmega32u4 -b 57600 -D -v -Uflash:w:ssr_v2_3_1.ino.hex:i
avrdude: Version 6.3-20171130
Copyright (c) 2000-2005 Brian Dean, http://www.bdmicro.com/
Copyright (c) 2007-2014 Joerg Wunsch
System wide configuration file is “/etc/avrdude.conf”
User configuration file is “/home/gnome/.avrduderc”
User configuration file does not exist or is not a regular file, skipping
Using Port : /dev/serial/by-path/platform-fd500000.pcie-pci-0000:01:00.0-usb-0:1.2.1:1.0
Using Programmer : avr109
Overriding Baud Rate : 57600
AVR Part : ATmega32U4
Chip Erase delay : 9000 us
PAGEL : PD7
BS2 : PA0
RESET disposition : dedicated
RETRY pulse : SCK
serial program mode : yes
parallel program mode : yes
Timeout : 200
StabDelay : 100
CmdexeDelay : 25
SyncLoops : 32
ByteDelay : 0
PollIndex : 3
PollValue : 0x53
Memory Detail :
Block Poll Page Polled
Memory Type Mode Delay Size Indx Paged Size Size #Pages MinW MaxW ReadBack
----------- ---- ----- ----- ---- ------ ------ ---- ------ ----- ----- ---------
eeprom 65 20 4 0 no 1024 4 0 9000 9000 0x00 0x00
flash 65 6 128 0 yes 32768 128 256 4500 4500 0x00 0x00
lfuse 0 0 0 0 no 1 0 0 9000 9000 0x00 0x00
hfuse 0 0 0 0 no 1 0 0 9000 9000 0x00 0x00
efuse 0 0 0 0 no 1 0 0 9000 9000 0x00 0x00
lock 0 0 0 0 no 1 0 0 9000 9000 0x00 0x00
calibration 0 0 0 0 no 1 0 0 0 0 0x00 0x00
signature 0 0 0 0 no 3 0 0 0 0 0x00 0x00
Programmer Type : butterfly
Description : Atmel AppNote AVR109 Boot Loader
Connecting to programmer: .
Found programmer: Id = “CATERIN”; type = S
Software Version = 1.0; No Hardware Version given.
Programmer supports auto addr increment.
Programmer supports buffered memory access with buffersize=128 bytes.
Programmer supports the following devices:
Device code: 0x44
avrdude: devcode selected: 0x44
avrdude: AVR device initialized and ready to accept instructions
Reading | ################################################## | 100% 0.00s
avrdude: Device signature = 0x1e9587 (probably m32u4)
avrdude: safemode: lfuse reads as FF
avrdude: safemode: hfuse reads as D0
avrdude: safemode: efuse reads as CB
avrdude: reading input file “ssr_v2_3_1.ino.hex”
avrdude: writing flash (19952 bytes):
Writing | ################################################## | 100% 1.60s
avrdude: 19952 bytes of flash written
avrdude: verifying flash memory against ssr_v2_3_1.ino.hex:
avrdude: load data flash data from input file ssr_v2_3_1.ino.hex:
avrdude: input file ssr_v2_3_1.ino.hex contains 19952 bytes
avrdude: reading on-chip flash data:
Reading | ################################################## | 100% 0.25s
avrdude: verifying …
avrdude: 19952 bytes of flash verified
avrdude: safemode: lfuse reads as FF
avrdude: safemode: hfuse reads as D0
avrdude: safemode: efuse reads as CB
avrdude: safemode: Fuses OK (E:CB, H:D0, L:FF)
avrdude done. Thank you.
In the unlikely situation where I’ve understood everything correctly that should be it for detecting CTT tags. I should have some CTT tags to test early next week so can report back then.
Regards,
Richard
Hi Richard, great progress here on a DIY solution to dual-mode!
It’s worth mentioning that CTT recently announced that they will be offering more direct guidance for folks like yourselves who want to make their DIY SensorGnome capable of detecting CTT tags.
Quoting David la Puma of CTT:
…we have decided that we will provide a how-to guide for building your own dongle for detecting CTT tags. We are currently working out the details of how to publish the code, since the way we decode our tags is not open source (and neither is Lotek’s, for their Nanotags). We will soon publish the code for anyone who wants to download and burn onto their Adafruit Feather. We will also publish the 3D print files for the case we were using, as it’s best to have these mounted in a case for protection.
I’m guessing it will still take a bit of time for them to put together and release a guide, but it’s great news for all the tinkerers out there who still want to add as much value as possible to the overall Motus network and should help you get your own dual-mode SensorGnome up and running — and optimized to detect both tag types.
Release candidate 11 for the Sensorgnome V2 software is ready! There are good news and less good news: the good news is that there is a slew of new features, the less good news is that I believe I will need yet another RC to add yet another feature…
Download: https://sensorgnome.s3.amazonaws.com/images/sg-armv7-rpi-2.0-rc11.zip
Documentation: Introduction and Overview | Sensorgnome V2 User Guide
RaspberryPi Imager: https://www.raspberrypi.com/software/
Please connect your Sensorgnome to the Internet (ethernet, wifi, or cellular): it provides a wealth of monitoring data and makes troubleshooting and helping you sooo much easier!
New features in this release since RC8 (the last one I posted here):
- cellular: added support for WaveShare SIM7600 series modems (USB dongle, these are lower cost and more readily available), this also adds infrastructure for supporting more cell modems although each model tends to require small tweaks, unfortunately
- naming: the ‘short name’ previously used to identify stations has been removed per request from BofC (“too many names for the same thing”), instead, the station name is used where possible/appropriate else the Sensorgnome ID is shown
- installation: to flash a MicroSD card it is now recommended to use the official RaspberryPi Imager, which runs on Windows, MacOS, and Linux, and which allows the card to be pre-configured so it has a password, connects to the network, and then automatically connects to Motus.
- installation: when using the RaspberryPi Imager it is now possible to fully configure the Sensorgnome without using the hot-spot (for some users the hot-spot works great but for others it never works).
- password: the Sensorgnome now has a single password for everything: web UI, hot-spot, and SSH; this hopefully reduces password fatigue a little (previously the hot-spot password had to be set separately because it was stored in plain text on the SDcard, now it is stored in a secure hashed form)
- status display: the blink pattern of the green LED built into the RaspberryPi boards now shows network connectivity status: 1 blink = no network, 2 = hot-spot is ON, 3 = internet is connected; this hopefully helps the initial install in particular when wondering “is it booted up yet???”
- remote commands: it is now possible to send the Sensorgnome a couple of “safe” commands remotely using the SGhub (www.sensorgnome.net): hot-spot on/off and reboot
- cellular: added info panel on network tab, and reduced overall bandwidth consumption
- charts: added charts on radio tab to support noise/performance measurements/monitoring (per suggestions from Adam - thanks!)
- upgrades: the upgrade process has been improved, but there’s room for more…
- SensorStation V1: added (preliminary) support for the CTT SensorStation V1
- documentation: new documentation including screen shots of the initial installation and configuration
Looking ahead, the main feature I’d like to get in before declaring “V1.0 release” is remote management, specifically, being able to access a Sensorgnome’s web UI remotely via the SGhub (www.sensorgnome.net). Other features are possibly supporting SensorStation V2/V3 and improving the set-up process further.
I would very much appreciate help testing this version, in particular I’d love feedback on the new set-up process via the RaspberryPi Imager, the pre-configuration, and the ability to configure without hot-spot. As you do this, please connect your Sensorgnome to the internet!
Upgrading: if you are running previous release candidates you can either replace the MicroSD card with a freshly flashed one or you can upgrade. The upgrade process requires a little patience, please read the upgrade notes at Software upgrade | Sensorgnome V2 User Guide
I’d like to thank all of you that have been running or explicitly testing earlier versions! I’ve now performed all the steps so may times that I don’t even see what I’m doing anymore and I just can’t detect usability issues anymore. Plus I only have a limited variety of hardware at hand.
Thanks much!
Thorsten von Eicken
Thanks Thorsten,
Installation was very easy with the image burnt via etcher on a PC. The whole process was done in a few minutes.
Two things of note:
- A couple of times is if I unplug a radio (either R802T2 or the adafruit feather) the web server crashes and needs a reboot to resolve.
- With the adafruit feather for CTT tags I’m getting good serial output (via USB and minicom at 38400 baud) on high USB ports:
{“protocol”:“1.0.0”,“meta”:{“data_type”:“coded_id”,“rssi”:-51},“data”:{“id”:“664B3434”}}
{“protocol”:“1.0.0”,“meta”:{“data_type”:“coded_id”,“rssi”:-48},“data”:{“id”:“664B3434”}}
{“protocol”:“1.0.0”,“meta”:{“data_type”:“coded_id”,“rssi”:-51},“data”:{“id”:“664B3434”}}
{“protocol”:“1.0.0”,“meta”:{“data_type”:“coded_id”,“rssi”:-51},“data”:{“id”:“664B3434”}}
{“protocol”:“1.0.0”,“meta”:{“data_type”:“coded_id”,“rssi”:-53},“data”:{“id”:“664B3434”}}
However on a lower USB port I’m getting a fair bit of rubbish in the output:
{“name”:“Sens{“name”:“SensorStationRadio”,“fi{“protocol”:“1.0.0”,“meta”:{“data_type”:“coded_id”,“rssi”:-58},“data”:{“id”:“664B3434”}}
{“name”:“SensorStationRadio”,{“protocol”:“1.0.0”,“meta”:{“data_type”:“coded_id”,“rssi”:-59},“data”:{“id”:“664B3434”}}
ame”:“SensorStationRadio”,“firmwar{“protocol”:“1.0.0”,“meta”:{“data_type”:“coded_id”,“rssi”:-56},“data”:{“id”:“664B3434”}}
adio”,“firmware”:“2.3.1”}{“protocol”:“1.0.0”,“meta”:{“data_type”:“coded_id”,“rssi”:-58},“data”:{“id”:“664B3434”}}
rStationRadio”,“firmware”:“2.{“protocol”:“1.0.0”,“meta”:{“data_type”:“coded_id”,“rssi”:-62},“data”:{“id”:“664B3434”}}
ationRadio”,“firmware”:"2.3.{“protocol”:“1.0.0”,“meta”:{“data_type”:“coded_id”,“rssi”:-61},“data”:{“id”:“664B3434”}}
{“name”:"SensorStationRadi
Consequently I’m not getting tag IDs in the Tags and Pulses widget that make any sense.
I’ve tried two feathers on different USB leads and they both perform perfectly away from the sensorgnome controlled ports so I’m not sure what’s going on. My serial debugging skills are a little limited but can have a go if you need more debug.
Regards,
Richard